
Category: Navigation Tips
Change Request Manual
Watch this video for a quick demo on how to submit a change request.
Updated 2/25/2020
Below you will find the full Change Request Manual with more in-depth information.
The constituent Change Request Form is in the upper left corner of the screen on an individual’s or organization’s page.
 |
Use the form to make a change request on the following:
DO NOT use the form for duplicate merge requests, Deceasing Requests, Special Codes, or Communication Preferences (see the end of the manual for how to request these items). If you need to request updates on more than five records, submit a Davie Help Desk ticket and include a spreadsheet with the PIDs and updated information, rather than submitting an individual request for each one. |
The form is multi-purpose, so you only need to fill out the areas you wish to change. The form below is for individuals and will be slightly different for organizations.

The Reason field at the top is required. To assist in processing your request, please provide as much information as possible. Items to Include:
- Reason and context for the change
- Source of the information
- If the information did not come directly from the constituent, a website for verification of the change, if possible
- Additional information regarding your request that you cannot fit elsewhere on the request form
- DO NOT use this area for miscellaneous change requests that do not fit elsewhere. Use the Other Changes area at the bottom of the form.

Open the poplars on the left edge of the green header bars to expand any areas you need to fill out.
- Personal/Organization Information
- This section will change, depending on if you are on an individual or organization record. (See two screenshots below.)
- The Website field is for the website of the individual or organization, NOT for a link to a website that supports your change request. (Supporting links should go in the Reason field at the top of the form, shown in the screenshot above.)


- Contact Information – Each area has a section to request new information be added or to edit existing information
-
- Addresses:
- Add New – Use if you are:
- Adding a new address
- Replacing an existing address or the constituent has moved
- If the constituent has moved, Click the Moved? checkbox in the Add New DO NOT edit the existing address in the Edit Existing list.
- NOTE that Address Type, City, and State are required
- Add New – Use if you are:
- Addresses:

-
-
- Edit Existing – Use if you are:
- Correcting an error or typo
- Updating Type/Primary/Do Not Contact
- Adding an End Date when there is no new address to replace the old one.
- Note that you cannot request an End Date on a Primary address.
- If the constituent is an individual and has a new Business Address, please provide information regarding any change in employment in the Business Relationships area.
- Edit Existing – Use if you are:
-

-
- Phones and Emails:
- Add New – Use if you are:
- Adding a phone number or email
- Replacing an existing phone or email
- Click the Replace Old? checkbox in the Add New list. DO NOT edit the existing phone/email in the Edit Existing list.
- Edit Existing – Use if you are:
- Correcting an error or typo
- Updating Type/Primary/Do Not Contact
- Add New – Use if you are:
- Phones and Emails:


-
- If you accidentally add a blank row to the Add New list, you can delete it by clicking the gray box at the left side of the row and clicking the delete key on your keyboard.
- Relationships
- This section will change, depending on if you are on an individual or organization record.
- Use the free-text fields for new relationships or changes to existing relationships.
- Use the appropriate field, depending on the type of relationship.
- For Individuals:
- Personal Relationships – marriage, divorce, parents, children, etc.
- Business Relationships – employment changes, retirement, etc.
- For Organizations:
- Relationships with Individuals – board/foundation members, employees, contacts for the org, etc.
- Relationships with Other Organizations – parent, subsidiary, etc.
- For Individuals:
- Provide the type of relationship and be specific about who is who in the relationship.
- Provide PIDs and names of records that are in Davie.
- If the related records are not in Davie, or you cannot find them in Davie, provide full name and contact information. There is no need to submit a separate Add New Individual/Organization Request in Davie for these situations.
- If you are changing an existing relationship, be sure to specify which relationship needs to change and the related individual’s PID and name.
- Provide additional context, if needed, as relationship change requests may be complex. For example, marriages, divorces, and employment changes may require changes to addresses and other relationships, in addition to the main relationship.


- Other Changes
- Use this area for any changes that do not fit in the existing areas of the form.
- DO NOT use this area to request merging of duplicate records, submit Deceasing Requests, or request updates to Special Codes or Communication Preferences. Submit these requests using the existing buttons on the constituent’s left side bar or the appropriate tabs.

When you are done filling out the form, click the Save button to submit your changes. You will receive an email summarizing the change, and another email when the request has been completed. Requests can take a few days to process, especially if they are complex. If it has been an extended time since you submitted your request, and you have not received confirmation it is complete, please submit a Davie helpdesk ticket.
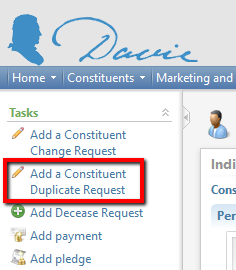
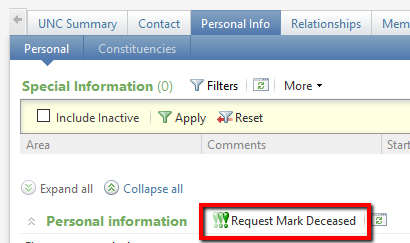
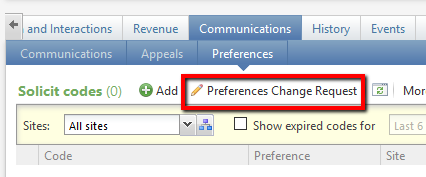
Duplicate Merges, Deceasing Requests, Special Codes, Communication Preferences
The following change requests are processed outside of the main Change Request system. The screenshots indicate where to find the request buttons for these items.
- Duplicate Merges
- Deceasing Requests
- Special Codes

- Communication Preferences
UNC Tokens
Tokens is a method for recording and viewing items that have been given to a person for cultivation or stewardship purposes. There is a UNC Tokens subtab on the Documentation and Interactions tab on all constituent records. Tokens can be added individually by users or in bulk by submitting a ticket to Davie Support. Below is a brief outline of the new functionality and how it should be used.
What should go in the Tokens area?
Any significant or substantial item provided for cultivation or stewardship purposes. Tokens may best be described as what they are not.
- A token is NOT something provided in exchange or as a “thank you” for a specific donation or commitment, or anything else that will affect the tax implications of a donor’s giving. All questions regarding these gifts must go to Gift Services.
- A token is NOT an insignificant item that is simply part of a mailing or given to attendees of an event that is already tracked somewhere else on a constituent’s record. For example, stickers, regular pens/pencils, drink cozies, informational booklet, etc.
How do I view tokens on a constituent’s record?
All users can view tokens by visiting a constituent’s record, clicking on the Documentation and Interactions tab, and then clicking the UNC Tokens subtab. All tokens given to both the constituent and the constituent’s current spouse will be displayed. Like most lists in Davie, columns can be added and sorted, results can be filtered, and the list can be downloaded to Excel.

How do I add tokens to a constituent’s record?
- To add tokens to a single record, simply click the “Add” button when viewing tokens on a constituent’s record. A form will appear displaying required and optional fields. Complete the form and click “Save”.


- To add tokens in bulk, submit a Davie Help ticket using the Request Help link on the Davie portal. This is a great solution if you have 20 or more tokens that need to be added at once. The file template for batch token import is available online by visiting the Davie Portal and searching for “Tokens”.
Can I add an item that is not in the drop-down list?
The list of available items is restricted to what shows in the drop down on the “Add a token” form. Specific details can be added in the description field, which is free text. There is an “Other” option in each category to allow for more flexibility. Please send requests for adding a new category/item in a Davie Help ticket. We fully anticipate adding new items as we grow this functionality.
A complete list of available items is available online by visiting the Davie portal and searching for “Tokens”.
What else should I know about tokens?
- There is a node available in the query designer (labeled Tokens). All fields are available for query.
- Fundraisers and stewardship coordinators can edit existing tokens. If a token needs to be edited or deleted and you do not have the necessary permissions, simply submit a Davie Help ticket.
- Token Fields and Descriptions
- Given By/On Behalf Of – (Required) Fundraiser/Stewardship Coordinator/Staff who is responsible for the prospect receiving the token.
- Presented By – (Optional) Staff member that physically presented the item. For instance, a token may have been “Given By/On Behalf Of” the Chancellor, but the token was physically “Presented By” a gift officer who is working with that prospect.
- Site – (Required) Site associated with the token
- Category – (Required) All available items belong to a category.
- Item – (Required) The actual item being given. Requests to add new values must be submitted to Davie Support.
- Date Given – (Required) Date the item was sent or given to prospect
- Delivery Method – (Required) Method used to give token to prospect
- Purpose – (Required) Reason token was given to prospect
- Quantity – (Required) Defaults to 1
- Item Description – (Optional, but encouraged) Specifics about the token (book title, design on shirt, image in a Carolina print, etc.)
- Comments – (Optional) Any additional important information, possibly about the purpose for the token or details regarding the meeting or presentation.
Links
- Current UNC Token Item List
- Tokens Batch Import Template found in the Batch Templates area on the Forms and Templates page
Davie VPN Access
This content is Onyen protected. Please enter your Onyen to log in and view it.
Constituents/Navigation – Gift Stat – New, Renewed or Reactivated
This content is Onyen protected. Please enter your Onyen to log in and view it.
Constituents/Navigation – Why is this constituent marked Inactive?
This content is Onyen protected. Please enter your Onyen to log in and view it.
How do I update someone’s job title?
This content is Onyen protected. Please enter your Onyen to log in and view it.
Extended Network Relationship Tree
This content is Onyen protected. Please enter your Onyen to log in and view it.
Where are Research Profiles Stored in Davie?
This content is Onyen protected. Please enter your Onyen to log in and view it.
Primary Constituency
This content is Onyen protected. Please enter your Onyen to log in and view it.
What’s the asterisk for?
This content is Onyen protected. Please enter your Onyen to log in and view it.