Category: Tips and Tricks (All)
Helpdesk – How to Create and Submit a Davie Helpdesk Ticket Request
Davie helpdesk tickets are submitted by navigating to the Davie Portal and clicking the Request Help link (highlighted in green) on the left side of the page.
When to Request Help
Users are required to submit a Davie Helpdesk ticket when requesting assistance from the BA team – but not all situations require a BA’s assistance. Please keep the guidelines below in mind for when it is best to submit, and to not submit a ticket.
Items that require a ticket via the Davie Helpdesk include:
- Specific Davie questions or issues to be researched
- Reporting and troubleshooting an error in Davie
- Submission of data to be updated in bulk – ten or more records
- Record creation, record updates, interaction uploads, note uploads
- Modifying an Export Definition
- Requesting advanced assistance with extracting data from Davie
- Updating existing or building new queries and reports
- Requesting updates that you cannot perform in Davie
- Interaction deletion, membership creation, committee member changes, etc.
- Adding a contact photo to Constituent Records
Items that do not require a ticket and should be requested directly within Davie include:
- Updating a Constituent’s Communication Preferences
- Submit via “Preference Change Request” form
- Identifying duplicate records
- Submit via “Add a Constituent Duplicate Request” form
- Requesting the creation of a new appeal
- Submit via “UNC Marketing New Appeal Request” form
- Updating fewer than ten Constituent Records
- Submit individually via “Add a Constituent Change Request” form
- Updating or correcting existing revenue transactions
- Submit via “UNC Add Revenue Correction Request” form
- Requesting to run or activate Davie communication processes
- Event Invitations, General Correspondence, Marketing Efforts
- Updating plan managers and solicitors on an existing prospect plan
- Submit via “UNC Plan Role Update Request” form on the plan
NOTE: If a Davie communication process (Event Invitations, General Correspondence, Marketing Efforts) needs to be run the same day that it was requested, users must submit a Helpdesk ticket after completing the Request to Run Process form.
Resources to Review
The following sites include detailed instructions and process documentation – please utilize these resources and review the available information before submitting a ticket, as they may provide the answers to your questions.
- Sakai
- Unlimited Davie Training – users can rewatch the e-class modules as many times as they’d like without needing to complete the entire course or retake the assessment
- Resource Documents – users can access and download reference documents and watch relevant videos, located at the end of each training course
- Davie Portal
- Forms and Templates – users can access a variety of forms and templates including the Online Event Registration Request, Pledge and Intent Forms, and a variety of Batch Templates complete with instructions
- Tips & Tricks – users can search the site for tips and tricks related to Davie training, including updated policies, best practices, and a glossary
- Service Now
- Previous Tickets – users can refer back to past tickets and locate previously provided instructional steps or the exact names of a specific process, query, or report
Create a Ticket
|
 |
Necessary Information to Include
Davie Support cannot complete Helpdesk Tickets that provide incomplete information. To help ensure that your ticket is processed as quickly as possible, please include all relevant details of your issue or request in the description, such as:
- The purpose or intended outcome of request
- Constituent Lookup IDs
- Revenue or Event Record IDs
- Names/dates of items like plans, steps/interactions, processes, efforts, events, and queries
Be Precise when reporting an issue or error and provide baseline technical details, including:
- Time of first occurrence and the location in Davie
- What exact task/function were you doing when you received the error
- Attach a screenshot or the exact text of the error message
- Confirm an attempt was made to replicate the issue
- Log out, close browser, open new window, check VPN status
- Is the problem affecting multiple users or just you?
Be Thorough when requesting a list, report, or query creation and include the following information which helps the BA team ensure the appropriate process is obeyed and that you receive the desired data
- Please make sure to always provide current details, as it is not always possible to refer to or use criteria from previous requests
WHOdefine the intended audience to include |
WHATlist the fields you need to see in the output |
HOWdescribe how you will use the data once received |
WHYexplain the overall purpose of the request |
This actual ticket from a Davie user demonstrates how to communicate requests efficiently and effectively:
Hello, I have a query called PHAR FYXX Pharmacy Alumni in Western NC County that is pulling some information wrong, and I was hoping to get some help. I am wanting only individuals that reside in the counties listed in the query that are PHAR alumni or who have given to PHAR since FY18. I see that it is pulling other states, other NC counties, and entities as well as individuals. Could you tell me what I did wrong?
Be Crystal Clear when communicating your requests and avoid asking general questions, such as:
- DON’T: ask “How can I see campaign giving?” or “Can you add campaign giving?“
- DO: request “Please add campaign giving totals for UNC and Site to [x] export definition (or query).”
This approach enables us to fulfill your request accurately without delays caused by seeking clarification.
Be Explicit and provide specific definitions when submitting requests, for example:
- Alumni – all active, living alumni for [x] site
- Donors – all constituents with household aggregate giving by site $500+
- Friends – all constituents with an active (no end date) UNC Award and Involvement on their record for [friend of xx site affinity]
Protocol for Open Tickets
Precise requests and quick responses bring swift solutions
Please Remember to…
- Communicate promptly if the request is no longer needed or if you’ve resolved the issue yourself
- Respond to each question thoroughly and in a timely manner (within 2 days if possible)
- Inform us if you’re planning on being away or unavailable so we know to hold the ticket open
- If Davie Support has reached out at least twice and no response is received in over a week, the ticket will be closed
Please Remember to Avoid…
- Submitting more than one ticket about the same topic/issue
- Multiple attachments can be added to a single request
- Sending communications related to an existing ticket outside of Service Now
- All ticket related communications must be done within the ticketing system
- Requesting a resolution “ASAP”
- Davie Support works on several projects so ASAP can have a different meaning – please provide a project date
Navigating ServiceNow
While most users prefer to communicate on active tickets by responding to the email with the fulfiller comment, the ServiceNow ticketing platform must be used when completing certain steps such as attaching a file to an open ticket.
Users must log in to ServiceNow using the following steps to view or upload files:
- Go to the UNC Help Portal
- Click on the ONYEN LOGIN to sign in
- Once you’ve logged on, select My Requests in the top menu and locate the ticket in question
- Click on the hyperlinked name to open the ticket and you will see a section for Attachments
- Use the Paperclip Icon to add an attachment or select the hyperlinked name to open a file
Reminders
- Although users will receive an automated email notification when a fulfiller attaches a file to the ticket, the attachment can only be accessed via the ticket in ServiceNow
- If the ticket involves multiple versions or updates to an attached file, please make sure that each version has a unique name to avoid confusion
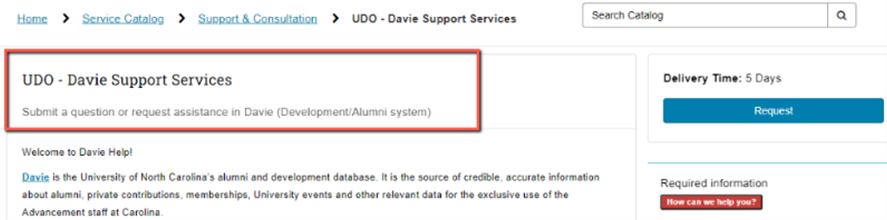
UNC Event Check-In App Walkthrough
The UNC Event Check-In “App” is a mobile friendly webpage. It is a flexible way to quickly check-in event attendees and will also allow for some registration options. It can be used on a computer, phone, or tablet and does not require the device to be on campus or connected to the VPN. It requires onyen log in and updates Davie in real-time.
Key Points
- You must log in to the app and be a Coordinator on the Davie Event to update the event via the Event Check-In App
- This app can update attendance for any registrant or register invited constituents and unnamed guests
- If the Unnamed Guest needs to be linked to a constituent that was not invited to the event, that can be done within Davie.
- This app is not intended to register and take payment for events that have a registration cost
Required Set Up
- The event must exist in Davie
- Only Davie users that are added as a Coordinator on the Davie event will have access to update attendance for an event. Coordinators can be added when creating the Davie event or by clicking on the Tasks/Coordinators tab when on an existing event.
- Constituents must be registered for or invited to the event.
How to Access an Event on the App
- Open a browser and go to https://give.unc.edu/eventcheckin/
- Log in with onyen credentials
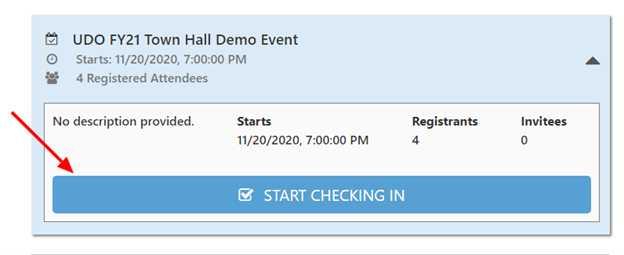
- All Davie events with a Start Date 4 days in the past or future will appear
- Click on desired event and click START CHECKING IN
- If the signed-in user is not a coordinator for the Davie event, it will be view-only access. It can take some time for newly created events or newly added coordinators to be updated on the site (an hour or two).
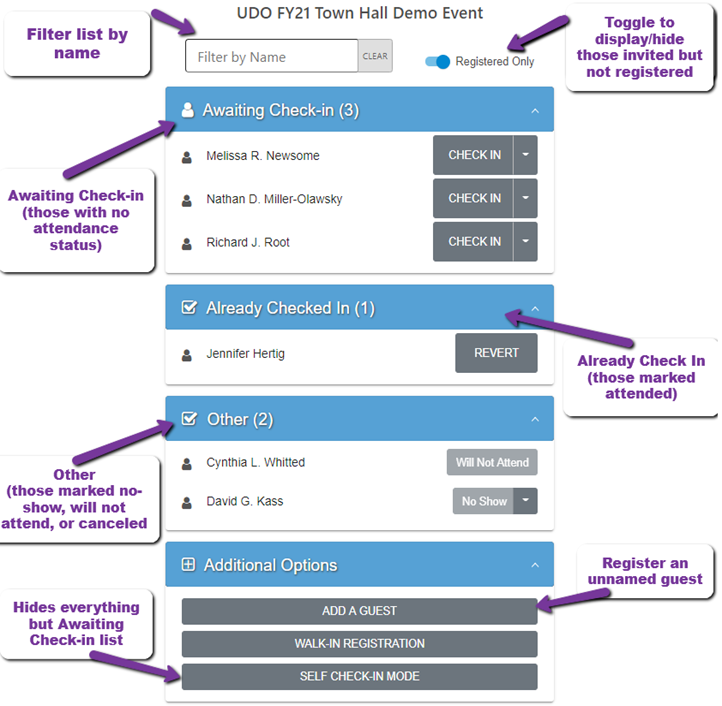
Check-In App Overview
Below is a screenshot of the Check-In App along with description for the various components. Below the screenshot are explanations of the different buttons and their functions.
How to Use the App to Update Attendance for Registrants
- To simply check in a registrant, click CHECK IN by their name
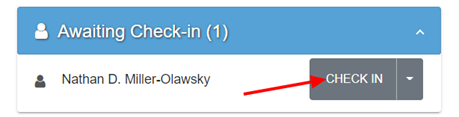
- For Additional Options for a registrant awaiting check-in, click the arrow next to CHECK IN
- Group Check-in allows check in of an entire group, if the registrant is a host or guest
- Mark as No-Show updates the registrant’s status to no-show

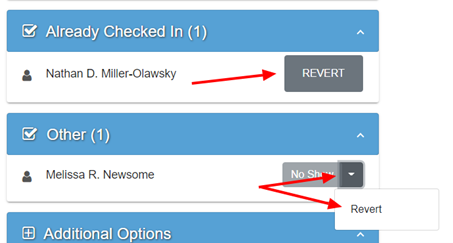
- Once a registrant has been checked-in or marked as no-show, they will be moved to the appropriate list. The option to REVERT that choice will remove the attendance status and put them back in the Awaiting Check-in
How to Register New Constituents
- New Registrations can only be added if there is no cost associated to the registration option
- New Unnamed Guests can be added and associated to existing registrants
- At the bottom of the page, click ADD A GUEST
- Type in the guest’s name, select a registration option, select a host, and click SUBMIT
- This creates an Unnamed Guest and adds the Guest Name. It does not create a constituent record.
- If the Unnamed Guest needs to be linked to a constituent that was not invited to the event, that can be done within Davie.
- Constituents that have been invited can be registered
- At the top of the page, toggle off the indicator labeled Registered Only. This will show registered and invited constituents
- For those constituents that were invited but did not register, click the Arrow by INVITED and click Register.
- A box will appear, allowing the registration option to be selected and any additional guests to be added.
- Click Register and Check in when complete
- Walk-In Registration is displayed as an option at the bottom of the page but is currently not available and is planned as a future enhancement.
Self Check-In
- If desired, a streamlined version of this app is available, allowing for event attendees to check themselves in.
- At the top of the page, set the toggle for Registered Only to the desired setting. Only displaying those registered will likely be simpler for attendees to use the app.
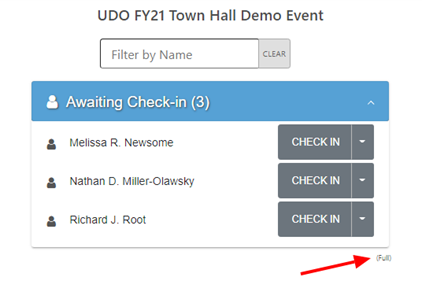
- At the bottom of the page, click the option labeled SELF CHECK-IN MODE
- This displays only those awaiting check in, the basic check-in options, and the Filter by Name option.
- To exit SELF CHECK-IN MODE, at the bottom right of the list is a small, inconspicuous link labeled (Full). Clicking this will return the app back to standard mode.
Anonymous and Confidential in Davie
- Gives Anonymously indicates that the constituent is anonymous from the constituent level.
- Given Anonymously indicates that the transaction is anonymous at the gift level
- Confidential indicates that the constituent has requested their information not be released or published
Items to Note:
-
- If Given Anonymously is Yes but the Gives Anonymously has No, a transaction has been marked anonymous and the constituent does NOT receive recognition credit.
- If Gives Anonymously is Yes and Given Anonymously is Yes, the constituent receives recognition credit for gifts/transactions.
For the purpose of honor rolls, donor lists and any type of giving publication, individuals marked as Gives Anonymously should not be listed and their information should not be published publicly without prior consent from the donor. The includes their name and/or donation amount.
Additionally, in any publication, regardless of the purpose, where the individual is marked Confidential, their information should never be published publicly.
Gifts that are anonymous at the gift level should not be part of any constituent’s donor recognition for public view without their consent. These gifts can qualify the constituent for recognition programs, but the Recognition Program manager will have to manually add the appropriate program or level and indicate this within the Recognition Program via the Anonymous field.
If you have any questions related to these definitions, please reach out to the Davie Helpdesk.
Event ROI Tab
We are very excited to unveil the UNC Event ROI tab, available on all Davie events. This tab provides valuable information about the constituents that were invited to and/or registered for an Event. The information available on this tab can be broken up into two general categories:
- Rating and current engagement details
- Prospect and giving activity that occurred following the event
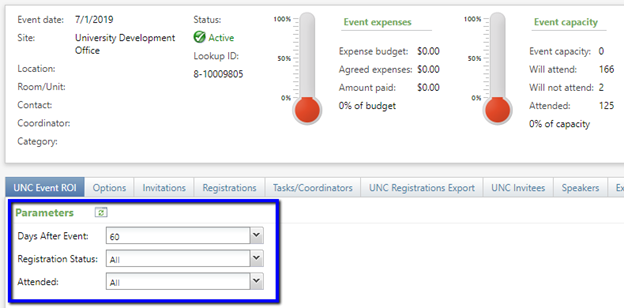
Filtering
At the top of the tab is a set of filters, which allows a user to restrict the results. The first filter restricts how many days after the event should be used for the giving and prospect moves summaries. The second and third filters restrict the population by registration or attendance status.
Summaries
For the requested parameters, data is first summarized tables and graphs.
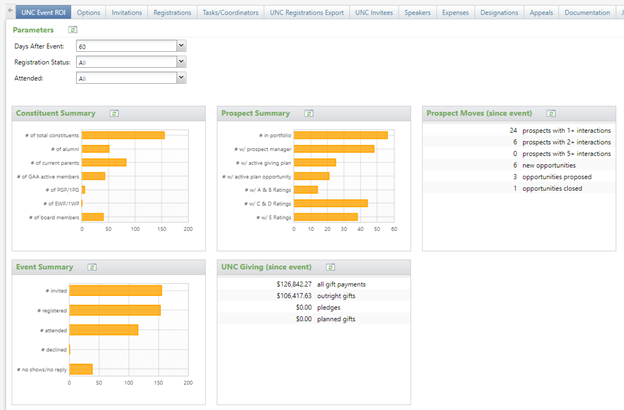
Constituent Summary – provides basic demographic information about the constituents
Prospect Summary – provides current wealth and engagement data points
Prospect Moves (since event) – provides information about prospect activity that has occurred since the event, based on the “Days After Event” parameter
Event Summary – provides basic counts for event response and attendance
UNC Giving (since event) – provides revenue and fundraising commitment activity that has occurred since the event, based on the “Days After Event” parameter
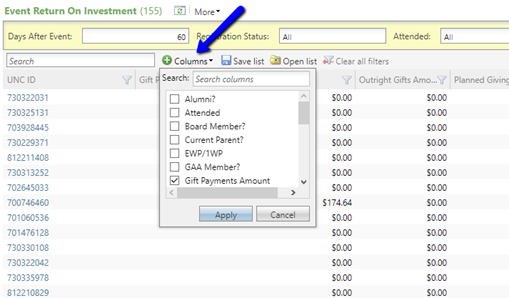
Data list
At the bottom of the tab is a data list that shows all the data that are in the summaries, but listed by constituent. Users can determine which columns to view by clicking “Columns” at the top of the data list. The UNC ID field is clickable to go directly to a constituent’s record, and the results can be downloaded to Excel by clicking “More” at the top of the data list.
Click here to watch a video in Sakai about the ROI tab features. (You will be prompted to log in with your onyen and password to view it.)
Events Enhancement – Coordinators
ENHANCEMENT – Add Coordinator(s) when creating an event
Coordinators can now be added at the same time you create an event. Before, it could only be done from the Coordinators tab after the event was created. As we all begin to use Davie events more, we encourage identifying staff member(s) that serve as the point person for a given event.
When creating a new event, simply click the “Coordinators” tab to access this new functionality.
Reminder – Coordinators represent the UNC staff that are coordinating the event. The Contact field (not shown below) is intended to represent the contact at the event venue.

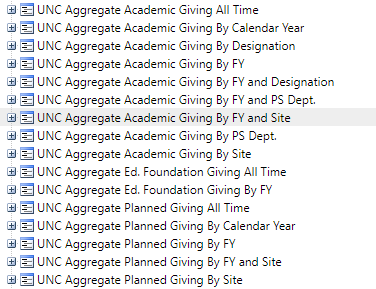
UNC Aggregate Query Node Updates
In an effort to improve the consistency and usability of our Constituent Recognition aggregates, a new set of query nodes is available for use. These new query nodes have a consistent naming convention and output format, and instead of having separate nodes from Individual and Household Totals, these new aggregates have both numbers in them. All the new query nodes begin with “UNC Aggregate”.
The old aggregate query nodes are flagged with the word “[DEPRECATED]” to identify them.
Please refrain from using the former nodes in any new queries created and whenever possible, replace any existing queries with these new aggregates as you use the query.
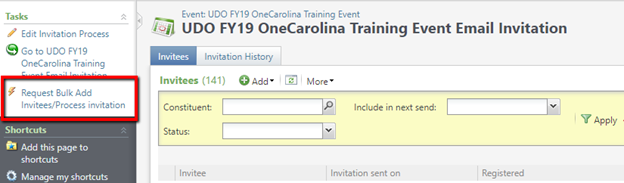
Events Workflow Change – Invitation Process
WORKFLOW CHANGE – Invitation Process
The process for getting a file to use for sending invitations is now similar to other communication processes in Davie. The process is outlined below, but we encourage taking the new training to get a hands-on understanding.
New process for getting a file for sending invitations
- Create the event in Davie
- Create an invitation process
- NAMING CONVENTION – Each invitation should start with the name of the event, followed by the invitation name. For example, UDO FY20 Fall Stewardship Event Mail Invitation
- A process should be specifically mail or email. If both mailed and emailed invitations will be sent, two invitation processes must be created.
- Please use this for Save the Date communications as well. Multiple invitations can be created to keep lists separate (save the date vs. invitation, regular invite vs. special invite to board members, etc.)
- Submit Request Bulk Add Invitees/Process invitation
- Click the link for an invitation to get to the invitees list.
- Users can add invitees one at a time, for seeds, special additions, or small lists.
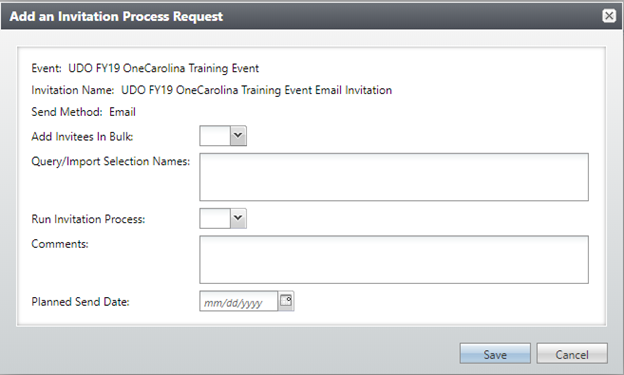
- To add invitees using a query or import selection, there is a new request form that can be submitted within Davie. (screenshots below)
- There is also a comment field as needed and should be used to communicate special requests (such as, requesting a file of those excluded or highlighting if it is an opt-in group that shouldn’t have solicit codes applied (e.g. board meetings))
- This same request form is used to request the invitation be processed.
- Processing the invitation will mark constituent records with the communication, mark them as invited to the event, and provide a file to use for sending the communication.
- Click the link for an invitation to get to the invitees list.
Importing Lookup IDs Using an Import Selection
This content is Onyen protected. Please enter your Onyen to log in and view it.
Export Processes
What is an Export Process?
Most Davie processes identify the “who” using various methods, mark constituents with the communication, and then create a file using fields in an export definition. An Export Process uses a single query/selection to identify the “who”, it does not mark records in any way, and creates a file using an export definition. It is a simple way to get information about a population when not running a communication process.
What is an Export Definition and how is it used?
An export definition is a defined set of fields which can return a wide variety of information about a population. It returns one row per constituent, and often has many fields/columns. Export definitions are used in various Davie processes, such as correspondence processes, marketing efforts, event invitation processes, and export processes. The different processes each function in a unique way, but the final file generated by the process is created using an export definition.
How can I alter the fields in an Export Definition?
For an export definition that belongs to your site, if you wish to add, remove, or reorder the columns, submit a ticket to Davie Support. Only a UDO Business Analyst should alter an export definition.
How to Run an Export Process
- Click Administration from the Navigation Menu. Select Export if you are not taken directly to the list of export processes.
- Search for Export Processes for site
- Click on Poplar and select Edit
- Click the magnifying glass by Selection, and search for desired selection. This can either be a query saved as a selection or an existing import selection.
- For Export definition, ensure desired export definition for your site is populated.
- Some sites have multiple export definitions for different purposes
- To alter which export definition is populated, click the magnifying glass and search for desired definition.
- Click Save
- Click Poplar and select Start Export
- Once the process is complete, click Download output from the Recent Status tab
- Files are only current as of when they were created. The Export Process must be rerun if updated information is required.
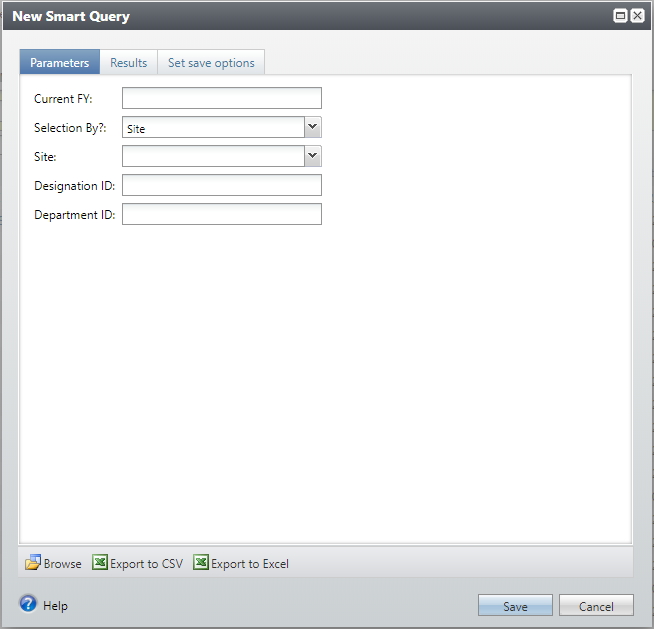
Smart Queries – A Fast Alternative
Smart queries are a simpler, easier alternative for some of the standard querying that users often need to accomplish. Access to smart queries is available upon completing Introduction to Querying, and doesn’t require the in-person, ad-hoc query training session. Examples of queries that can be accomplished with a smart query are pulling all active alumni from a particular school or degree, pulling all recognized donors for a specific time frame and giving area, or pulling all current members of a committee or group. A printable listing of available smart query definitions, along with descriptions and filters, can be found here
Smart Query Definitions
Table of Contents
- UNC Constituent gift recognition by designation and amount
- UNC Gift revenue payments by date and designation info
- UNC Designation list
- UNC Fundraising purposes with stewarded donors
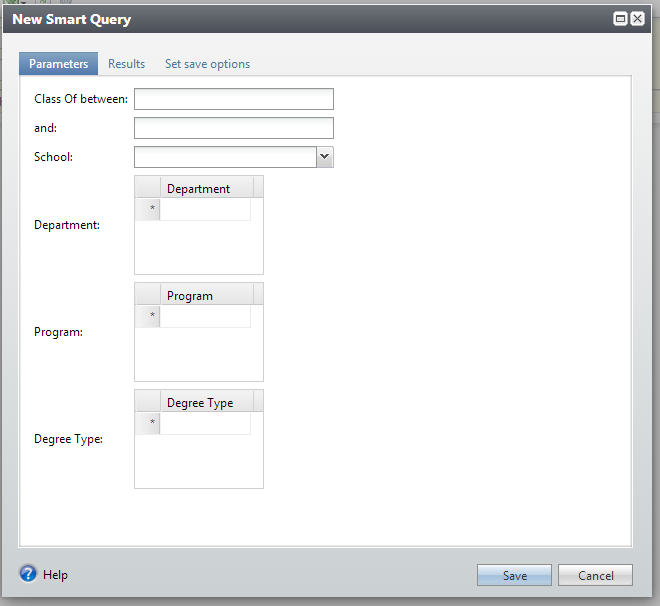
- UNC Alumni by school, degree and location
- UNC Alumni by school, major, degree and location
- UNC Constituents by educational involvement
- UNC Current students by school, level, class, etc.
- UNC Interactions completed by date, site, owner, constituent
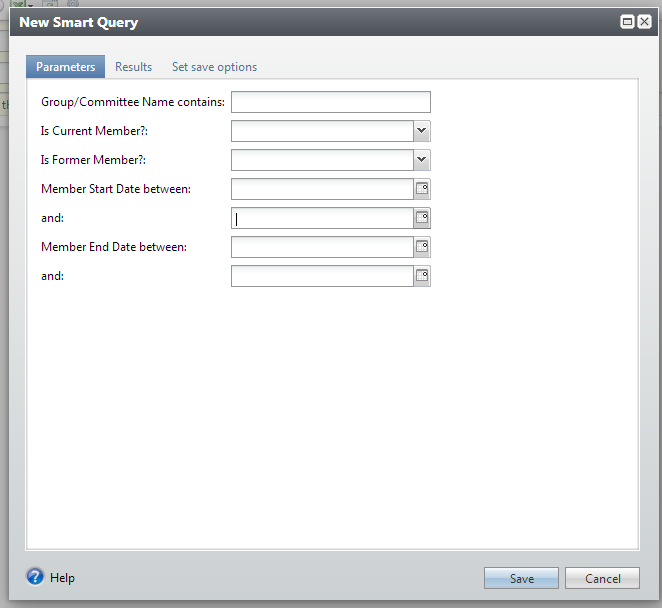
- Constituents by committee/group membership
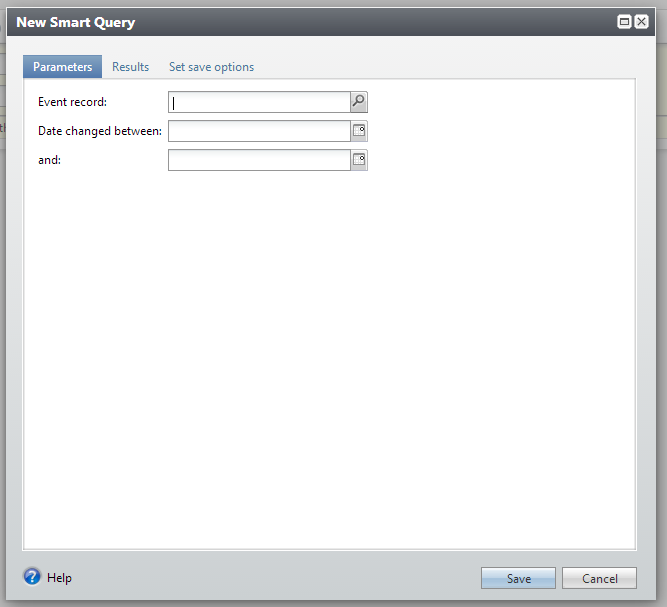
- Event registrants by event and date
- UNC Unit Annual Downgrade Smart Query
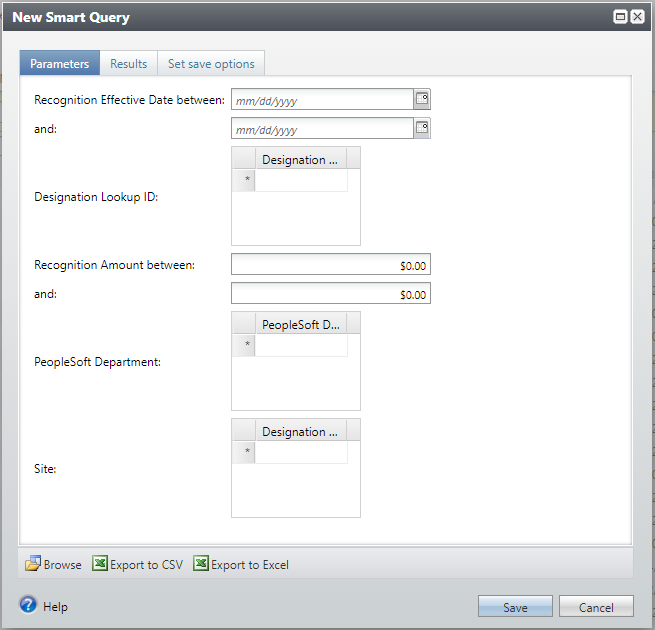
- Smart query definition name: UNC Constituent gift recognition by designation and amount
Smart query definition description: Returns constituents with recognition by site, designation or department by date
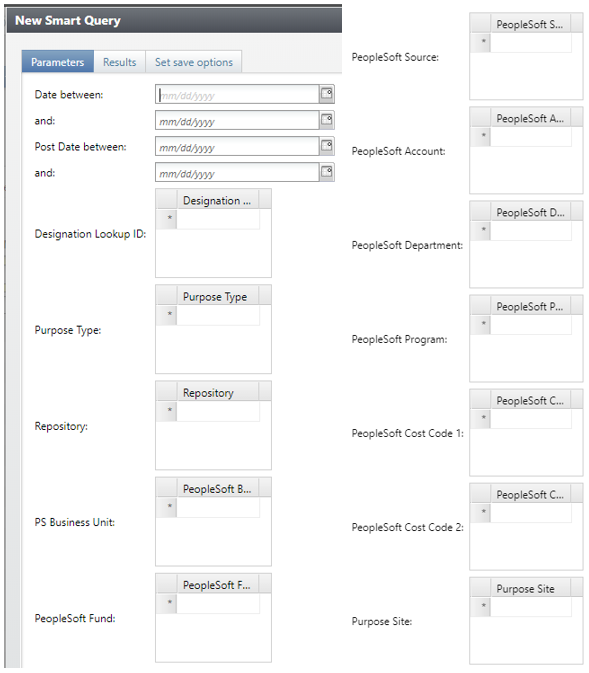
- Smart query definition name: UNC Gift revenue payments by date and designation info
Smart query definition description: Returns revenue payment transactions at the application detail level that include constituent name and primary address information, not to be confused with recognition.
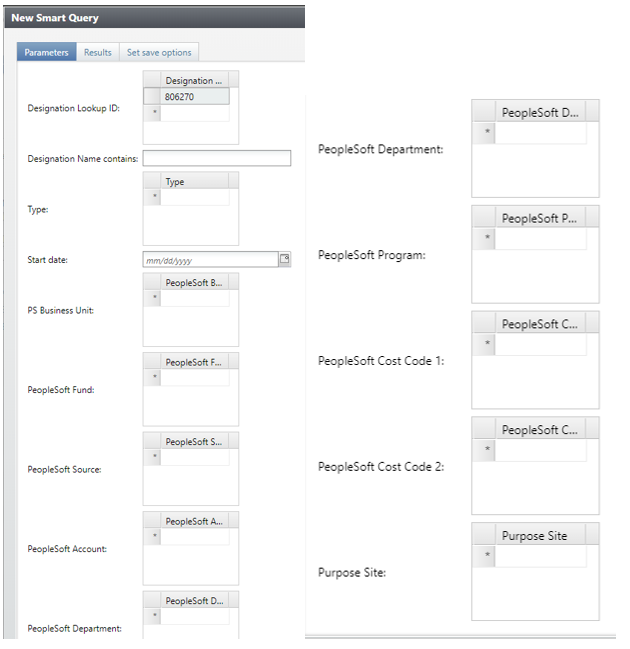
- Smart query definition name: UNC Designation list
Smart query definition description: Returns a list of designations by site, department, and accounting chart fields
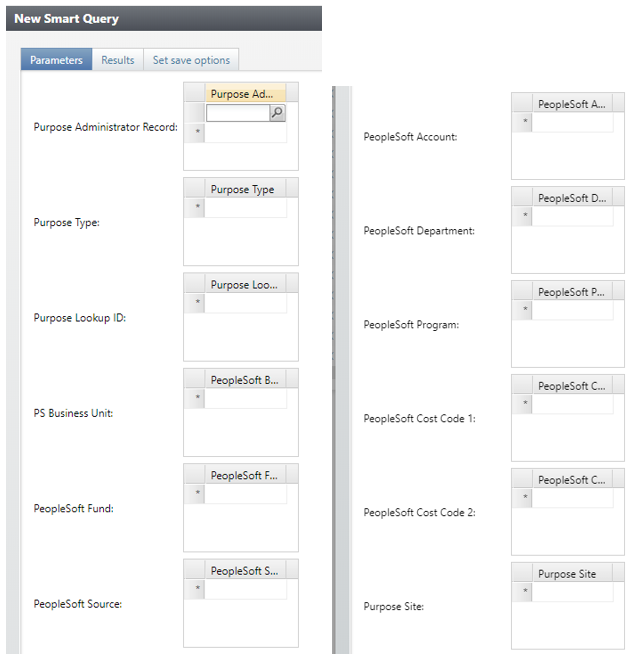
- Smart query definition name: UNC Fundraising purposes with stewarded donors
Smart query definition description: Returns fundraising purposes with administrators and stewarded donors with no end date including purpose details, donor name and primary address
- Smart query definition name: UNC Alumni by school, degree and location
Smart query definition description: Returns living UNC alumni by school, degree, city, state, country and county; includes ex-mats and looks at primary address
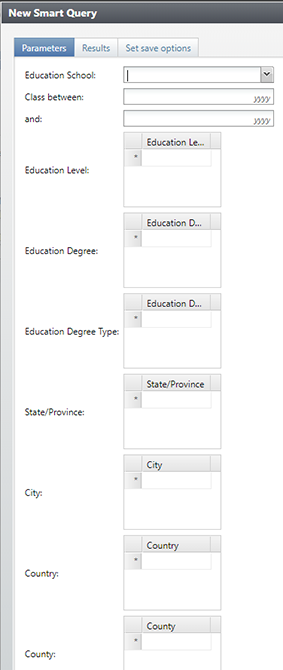
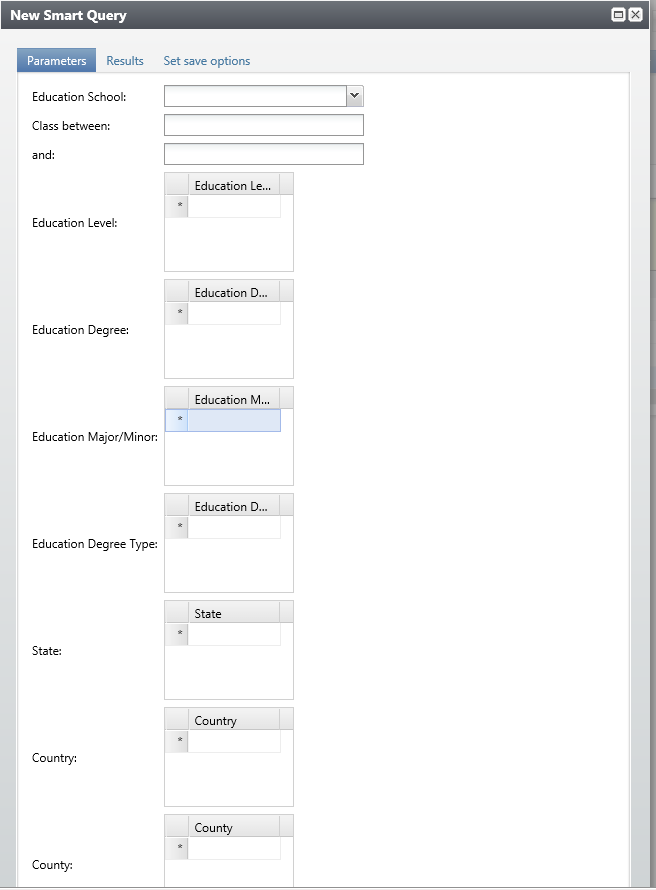
- Smart query definition name: UNC Alumni by school, major, degree and location
Smart query definition description: Returns living UNC alumni by school, major, degree, city, state, country and county; includes ex-mats and looks at primary address
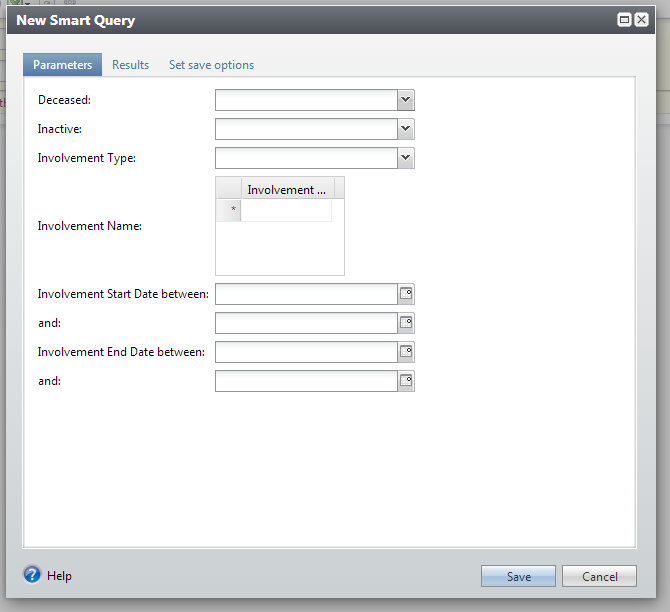
- Smart query definition name: UNC Constituents by educational involvement
Smart query definition description: Returns constituents by educational involvement, includes primary address
- Smart query definition name: UNC Current students by school, level, class, etc.
Smart query definition description: Returns current student constituents with education information and primary address
- Smart query definition name: UNC Interactions completed by date, site, owner, constituent
Smart query definition description: Returns completed interactions with status, comments, site, rating, employer, and primary contact info (does not include pending steps)

- Smart query definition name: Constituents by committee/group membership
Smart query definition description: Returns constituents by committee or group, includes primary address
- Smart query definition name: Event registrants by event and date
Smart query definition description: Returns events with registered constituents name, ID and balance
- Smart query definition name: UNC Unit Annual Downgrade Smart query
Smart query definition description: Returns donors that have gift recognition to a site, designation, or PS department for both the current and previous fiscal year, but level of support has decreased.